Culture Club ~ A story in (mostly) pictures

As I mentioned in my last post, I love love love fermenting food. For a long time I was interested but terrified – terrified of botulism (which you actually can’t get from fermenting food, just from canning it improperly) or any other undetectable-yet-deadly bacteria I might grow and then unknowingly kill myself and others with. I went to a lot of workshops and read some books and then was lucky enough to live with my very dear friend Farmer B. Farmer B is not only fearless about this kind of thing but also has a real talent and instinct for it. She’s a bacteria and yeast whisperer, you might say.

Farmer B getting ready to do some bacteria-whispering

The other barrier to doing urban-homesteader type food projects is time. There’s a reason we as a civilization have moved further and further away from DIY methods and developed all these conveniences – they save us the tons of time it takes to make foods by hand. To ferment vegetables you have to brine them for hours. Canning similarly involves hours of sterilizing, filling, boiling, etc. Of course a lot of this is down time, but let’s be realistic, you’re still going to spend the whole day in the kitchen.

So many veggies to chop and brine...

Which is why Farmer B and I created Culture Club. When you can chat while you chop and play games while the veggies are brining, crafting food becomes a party rather than a chore. It’s been hard to coordinate Culture Club with Farmer B so frequently away (farming!) but we took advantage of a window of Bay Area time and gathered friends together.

It's better with friends!

Culture Club has two components. One is making foods and the other is tasting/demoing foods. This is so that people who are perhaps interested in kombucha, say, can taste it and get an overview of the process before they commit to making it themselves. This time around we had two projects. The first was kimchi, using a recipe from Sandor Katz’s marvelous book Wild Fermentation. (Katz has been invaluable in helping me get over my paranoia about killing my loved ones with improperly fermented foods.) Culture Club had previously made a radish and roots kimchi, but this time around we went for the classic combination of napa cabbage, carrot, and daikon radish.

Giant, beautiful produce makes me dreamy! (That's a daikon radish I'm swooning over, there.)

Our second project was a blood orange cordial. A few months ago, I found an electric cordial maker (called “Cordially Yours!“) at Goodwill that promised to make cordial in hours rather than weeks, and I was super excited to test it out. I had done a small test-batch a few days earlier (no sense in wasting all that vodka if the thing didn’t even work) with Royal mandarins, but then a friend brought over blood oranges for a snack during a movie night and Farmer B and I just fell in love with the color. How dreamy would it be to have blood-orange colored cordial?

Zesting and juicing blood oranges for cordial

Blood orange juice & zest + vodka + sugar + "Cordially Yours!" + 4 hours = cordial. We hope!

While we waited for the vegetables to brine and the cordial maker to work its magic, we had our demo/tastings/lunch. Farmer B brought kombucha for all to try, and made a big pot of ogi, a fermented millet porridge, following another Sandor Katz recipe. We ate the ogi with stir-fried Chinese greens and homemade sauerkraut and turnip pickles, which were my contributions to the tasting party. I rounded out our lunch with cheela (mung bean pancakes) with tomato-coconut chutney. We also enjoyed a healthy amount of my initial test batch of cordial, which we had to drink for informational purposes of course. How could we know how to adjust the recipe if we didn’t drink thoroughly of the test version? And no Culture Club would be complete without a rousing round of some game, so after lunch we sat down with Balderdash (“the hilarious bluffing game!”) while we waited on the vegetables.

Tasting cordial out on the porch, where we brought the brine to cool it in the open air

Trying to fool each other with made-up definitions of obscure words

Once the vegetables had finished brining, we mixed them with a paste we’d made in the food processor of garlic, scallions, and ginger. I use a special Korean chili flake that seems like it has been deyhydrated in some way (not just dried, which I realize is the definition of “dehydration” but these seem like they were made into chili paste and then that was dehydrated and flaked and then you reconstitute it with warm water) and we made a paste from that and added it in as well. Kimchi can take a lot of heat before it starts to get spicy – we went through almost an entire giant bag of chili flakes.

Brined vegetables topped with two types of flavoring paste

Mixing the kimchi is the best part of the whole experience. We get to wear gloves – it’s DIY food surgery! (Is that gross?) The chile paste and the salty brine can be quite painful on your hands, but with protection you can flip and toss to your heart’s content.

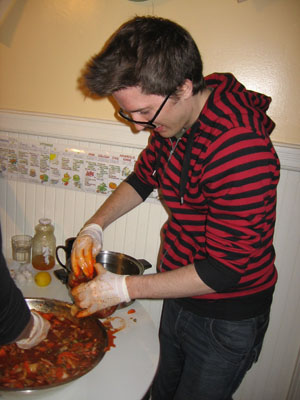
Stuffing jars with kimchi (with gloves to protect our hands from the chile paste)


The cordial finished with little fanfare. It turned out I hadn’t stirred long enough to dissolve all the sugar so there was a (tasty) bunch of it left on the bottom of the machine, which hadn’t happened during my test run. Even though the Cordially Yours! remarkably cuts the time cordials need to sit, the instructions do recommend that fruit cordials be allowed to steep for three days after the machine has worked its magic. So we poured it into jars and sent everyone home with their cordial and their kimchi. In three days and a week or two, respectively, each would blossom into the exciting foodstuffs of our dreams! (I know that’s the stupidest ending sentence ever for a blog post but it’s been a really long day and for some reason this post took forever to write. The whole “story in pictures” thing was supposed to make it go faster, but apparently that plan was a failure. Anyways. Let’s look at the pretty pretty things we made:)

The finished products! Blood orange cordial in the foreground, kimchi in the background.

Kim Chee had a party…

Go kim chee! It’s your birthday! Or rather, it’s your “done fermenting” day, although that doesn’t have the same ring to it.

If you recall, my Culture Club (a club for fermenting, pickling, canning, and preserving) made Radish and Roots Kim Chee from the book Wild Fermentation a little while back. I eagerly checked it every day, making sure my two jars (Medium and Spicy) had enough brine to cover all my veggies, and tasting (what a hardship!) to see if they tasted done. And when it was all fermented and ready to go, and I wanted to do something special for that first kim chee meal.

If you memory goes back eveeeen farther, you may remember that I got a book from the library called Glorious One-Pot Meals, with a patented (!) system for cooking a complete meal – including your rice/pasta/polenta/etc. – in a single Dutch oven, in the oven. I tried a lot of recipes from the book and had a lot of problems, which after a frustrating time of eating really gross food I traced to the fact that my oven thermometer was off by 50-75 degrees. By then the book needed to be returned to the library, so I wasn’t able to really give it a proper chance. But one recipe stuck with me, even under such trying circumstances.

The author calls this dish “Sesame Shitake Tofu.” I call it “My name is Scrumptious, and I am a vegetarian bibimbap addict. Please help me before I walk, zombie-like, to the nearest Korean restaurant and spend another $15 on a single bowl of food.” (We all know how much I object to spending $15 on a single bowl of food…)

I became a bibimbap addict during the year I lived in Massachusetts. Every weekend I would commute for a couple of hours each way from the rural area where I lived and worked to a town outside of Boston where I volunteered for an amazing organization called The Children’s Room. On the way home I’d be so hungry and tired I would stop first to get dinner. I’d been curious my whole life about Korean food but it never seemed to be vegetarian. But when I found a menu with something called “vegetarian bibimbap” I decided to give it a try.

The bibimbap in the Dutch oven, so you can see how the layers look after it's cooked. Check out that sexy browned rice!

The first thing that was unusual to me was that there were two prices for the bibimbap. For a several dollars more, you could get what seemed like the exact same ingredients, but served in a “stone pot.” I figured this was my one shot at Korean food, so I splurged and went the distance. What arrived at my table was a revelation. A bowl of rice with vegetables and an egg on top – but somehow so much more! The stone pot is heated to a high temperature and then coated with sesame oil. The egg cooks from the heat of the bowl, and the rice sizzles and browns in the best way. The veggies are sauteed and subtly seasoned, and there is often tofu, seaweed, bean threads, and other delicious unidentifiable morsels. Mostly it’s all about the rice, sizzling and browning to form an incredible crust.

Every time I order bibimbap and take the first bite, I invariably think to myself, “Why do I love this so much?” Despite the seasoned veggies and the crispy rice it has a kind of bland, sesame-oiliness to it that is a bit ho-hum. (Especially at $15 a bowl…) But you are meant to add hot chili sauce and other seasonings to it, to make it saltier and spicier. And once you do this, your second bite will be incredible. By the third bite you’ll be burning your mouth on the hot rice as you shovel it in.

When Duck and I made our first batch of Sesame Shitake Tofu and I took my first bite, that same thought crossed my mind. “This is so bland, and kind of oily… But wow, that rice crust is really great… and that seaweed… and those mushrooms… What if I added some tamari and hot chili sauce?… OH MY GOD IT’S BIBIMBAP MORE MORE!”

Something like that.

So when it came time to premiere the kim chee, I knew just the star vehicle to show off its spicy, salty talents to the utmost! It’s an incredible gift to have found this recipe, since most bibimbap recipes understandably (and authentically) are very complicated and time-consuming what with preparing all the seasoned vegetables and so on. (For example this Fat Free Vegan recipe that says “You will need to prepare at least 3 of the following recipes to go on top (4-5 is preferable).”) So even though I hate to pay so much (although it’s so totally worth the extra for the stone pot) I have never attempted to make bibimbap at home. To find a recipe that recreates, if not the exact composition, then very much the experience, and that recipe is made entirely in ONE POT… it’s like a Fermentation Day miracle!

One-pot Vegan Nearly-Bibimbap
Adapted from Sesame Shitake Tofu recipe from Elizabeth Yarnell’s very cool cookbook Glorious One-Pot Meals. Her method is very carefully designed, and I may have strayed from it in my adaptation, so any cooking snafus are my own error, not an error of her method! This recipe, written for a 2-quart Dutch oven, will serve two very generously. To fill a larger (3 1/2 – 4-quart) Dutch oven, simply double the recipe and add a few minutes to the cooking time – go by the “aroma” test, rather than the timer. You should also be able to make the smaller recipe in the larger Dutch oven with no problems.

2 t. sesame oil
1/3 cup dried arame seaweed
4-7 oz. extra-firm tofu, drained, pressed, cut into small cubes
1/4 C. + 1/4 C. Annie’s Sesame Shitake Vinaigrette (or other sesame dressing) (I used Annie’s)
1 C. sushi rice
8-10 dried shitake mushrooms, soaked in boiling water until tender, about half an hour (reserve soaking water)
1-2 C. napa cabbage, chopped
10 oz. package frozen spinach (no need to thaw!)

Preheat the oven to 450 degrees.
Wipe the inside and lid of a 2-quart Dutch oven (cast iron or enamel-lined) with the sesame oil.
Place the arame in a small bowl and cover with water, set aside.
Stir the tofu cubes with 1/4 cup of the vinaigrette, gently coating the cubes.
Put the rice in the bottom of the Dutch oven. Add 1 cup plus 1 tablespoon of liquid – using the shitake soaking water if you have enough, or adding more water as needed to reach the desired amount. Smooth rice and liquid to make an even layer in the bottom of the pot.
Chop the shitake mushrooms into small cubes and scatter in a layer over the rice.
Spread the tofu cubes in the next layer, making sure to get all the extra dressing from the bowl.
Drain and rinse the arame and sprinkle over the tofu.
Spread all the napa cabbage on the next layer.
Then top it all off with a layer of frozen spinach. (Don’t worry about frozen/not frozen ingredients – it all works out!)
Pour the remaining 1/4 cup of vinaigrette over the spinach.

Cover and bake for 45 minutes, or, as Elizabeth Yarnell says, “until 3 minutes after the aroma of a fully cooked meal escapes the oven.”

Scoop a big hunk from the pot, getting all the layers. Don’t be afraid to mix it up together on the plate or in the bowl. Serve with spicy and salty condiments on the side like kim chee, tamari/soy sauce, hot chili sauce, chili garlic sauce, etc…

Welcome home to a vegan, gluten-free Menu Plan Monday

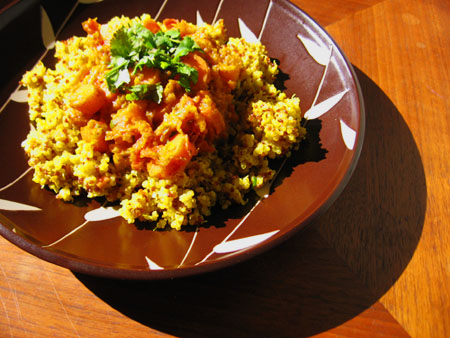
Butternut Squash and Carrot Stew with Quinoa Pilaf
I just got back from a long trip. I had a great time (I was with my mom on the East Coast and in Canada), but the traveler’s diet is not heavy on dark leafy greens, and it was such a relief to come home and dive back into a delicious pile of kale. Duck had one waiting for me, of course, the minute I walked in the door.

We’ve put our CSA box on hiatus again, which means we can menu plan from cookbooks this week. So most of our meal plan is from Veganomicon or another cookbook, The Vegan Table, that we are trying out from the library. I hated it when I first looked at it because it seemed to be full of ingredients like “eggless mayonaise” and “tofu cream cheese,” but then I looked it over again and found many recipes that excited me, and then I tried a few and am back to feeling wary. I’ll let you know how the week goes.

Because of the heavy reliance on cookbooks I don’t have a lot of links or photos for you this week, just a few of the old standards – sorry!

Cheryl at Gluten Free Goodness is hosting the GF Menu Swap this week with the theme of Carrots, which inspired me to take on the delicious (and time consuming, but worth it every once in a while) Moroccan butternut squash and carrot stew shown above. If you’ve been trying to eat quinoa regularly but are running out of ideas, try the quinoa pilaf that goes with the stew recipe. It’s so good that I often make it on its own. And of course, for a huge compendium of menu plans from all over the web, check out the massive Menu Plan Monday round-up over at OrgJunkie.

And please don’t forget – Sunday is the deadline to send me a favorite, tried-and-true, tested-and-approved recipe for beans, lentils, dried peas, and other pulses. I am putting together a master collection to help me – and others – conquer beanphobia. No need to write up something new for this event – the recipe can be in an old blog post, and in fact the longer you’ve been making it the better! Then come back here Wednesday, Nov 18th to check out pulse inspiration from all over the world!

pulse_logo

Monday:
Broiled smoky tempeh (VCon)
Smoky sauteed kale with onions (VCon)
Millet

Tuesday:
Rice bowl with black rice, kale, and leftover broiled smoky tempeh
I Am DIY Rice Bowl

Wednesday:
Hot and sour soup with tofu, carrots, shitake mushrooms, napa cabbage, and button mushrooms (VCon)
Braised bok choy with toasted sesame seeds (VCon)

Thursday:
Chana masala (made with canned chick peas)
Pumpkin coconut curry (The Vegan Table)
Brown basmati rice

Friday:
Cornmeal pizza crusts with chard & caramelized onions (Vegan Table) and balsamic portobellos (Vegan Table)

Saturday: Movie night – Little Chihuahua chile verde tofu burritos to sneak into the theater

Sunday:
Moroccan butternut squash and carrot stew with quinoa pilaf

Oh Drama! Oh Glory! Oh Cabbage!

Four Cabbage Stir-Fry

As you may recall, I am experiencing a bit of a cabbage glut. Thanks to mom, who came to the rescue with our family’s traditional cabbage salad, I used up the Wakefield, but the fridge still boasted a red cabbage, a Savoy cabbage, and most of a napa cabbage. And then the baby bok choy arrived…

Mom to the rescue, again! While mom was reading the cabbage salad recipe to me over the phone, she kept noticing other scrumptious-sounding recipes on the same page, and describing them to me in mouth-watering detail, so I had her read them to me, too. When she got to a recipe called “3 Cabbage Stir Fry,” I knew salvation was at hand.

I gathered four friends, and together we shredded the red cabbage, the Savoy cabbage, the napa cabbage, and sliced the baby bok choy. I hauled out the giant wok, made a double recipe of sauce, and we started stir-frying. (We had to do it two batches – that was a LOT of cabbage!) The results were beautiful and delicious and filling. I’m not saying I’d go out of my way to buy three or four different kinds of cabbage to make this, but it was truly just about that good.

Recipe is beyond Continue reading

Meanwhile…

My new box arrives tomorrow, and the only post I’ve made this week stars a vegetable that arrived a month ago. You may be feeling anxious for me right about now, wondering how I’m going to cope with an influx of new produce that will pile into my already overburdened refrigerator, since I clearly haven’t consumed any of the new arrivals yet. Fear not, gentle reader!, for this is not the case. I simply haven’t made anything worth photographing. So I thought that since this week has been so skimpy on posts I might make one documenting the simpler fates my produce meets throughout the week.

Because I know things are always better with pictures, I provide you with one here. What could be a better emblem of simplicity than my adorable rat, Crunch, nibbling a tender leaf of kale, no more processed than when it came out of the ground?

Crunch with kale

(For those of you who are grossed out even by pet rats, think of her as that cartoon chef rat in the Disney film Ratatouille. Everyone loved Ratatouille, right?)

The Fate of Box 10:

Lettuce: has gone into many a salad, including a full-meal salad tonight with carrots, thinly sliced daikon, Rome Beauty apple, napa cabbage, Manchego cheese, and hearts of palm, with a bizarre but tasty dressing of walnut oil, lemon olive oil, rice vinegar, and apple cider (I’m working on honing my dressing skills) .
Crocodile Spinach: Sauteed with garlic and then into a frittata with quinoa and port-infused Irish cheddar. Served with tempeh bacon, of course.
Pink Lady Apples: Snacked on straight and as a light lunch with some kind of beer-cheese. (Yes, I went a little cheese-mad at Trader Joe’s)
Satsuma Mandarins: Disappeared almost immediately as they are one of my top three favorite foods of all time.
Broccoli: Straight into the compost – more aphids than green stuff in this batch. So sad!
Kale and Collards: Immediately steamed and packed alongside quinoa and various lentil and chickpea dals from Tasty Bite, for several lovely lunches to-go.

Napa Cabbage in the Mist

I’ve simply given up on the lettuce, but now the abundance of napa cabbage means that it has basically become the new lettuce. (Hear that, trendsetters for ’08? Napa Cabbage is the New Lettuce!)

But then, just in time for the new year, when no napa cabbage should be left forlorn, Napa Cabbage with Shitake, Ginger, and Red Miso-Sake SauceI remembered an old recipe that I think will ensure that I’ll be eating as much of that long, tender, elegant cabbage as Eatwell can throw at me. Turning once again to my beloved Asian Vegetables cookbook, I dug out a recipe I haven’t made in years for halibut steamed in packets of napa cabbage. This was the kind of recipe that makes a lasting impression; four or five years later, my mouth can still recall perfectly the incredible taste of the dish. I don’t eat fish anymore, but the part of the dish that stands out so brightly in my memory wasn’t the halibut or even the cabbage, but rather the amazing sauce tucked in the packets alongside the fish. What I ended up with – sans halibut – was so good I went back for thirds. I have definitely found the Official Napa Cabbage Recipe of 2008. Cheers!

Napa Cabbage with Shitake Mushrooms,
Ginger Matchsticks, and Red Miso-Sake Sauce

Napa Cabbage with Shitake, Ginger, and Red Miso-Sake Sauce – 1 head napa cabbage
– 10-12 dried shitake mushrooms, soaked in hot water for 30 minutes
– 2 inches ginger, cut into “matchstick” sized pieces
– 4 T. red miso
– 2 T. mirin (sweet rice cooking wine)
– 4 T. sake (or to taste)
– 2-3 T. sugar (or to taste)
– 1 T. water or broth (or to taste)

Slice napa cabbage across the head into pieces. Unfurl the pieces and place in a steamer basket. Squeeze excess water from mushrooms and slice into thin strips. Put mushrooms and ginger into basket with cabbage, tossing to mix. Steam for ten minutes.

To make the sauce: combine red miso, mirin, sake, sugar, and water, until you have a tasty, sweet, slightly boozy concoction that makes your mouth water with delight. Make sure it’s not too salty or strong from the miso – you can add a bit more water or broth, keeping in mind the sauce will get thinner and more unwieldy the more water you add.

And now for my exciting food-blog-geek news! For my holiday presents this year, Duck tricked me out with all kinds of treats that I’ve been yearning after as I put together In My Box. The gorgeous crackle-glaze bowl in the photos above is from a huge assortment of beautiful dishes he got for me to spice up my food plating, and the FREE-FLOATING PHOTOS (a first here and which you may notice I am A LITTLE EXCITED about) come courtesy of my incredible new D-Flector, a miraculous portable photo studio background thingamajiggy which allows me, at long last, to take pictures of my food floating in the pure mists of empty space. I’m still just barely learning how to use all my new toys (the pics above are a bit more pixelly than I’d like, for example) but I am terribly excited and predict much beautiful food to come, just so I can have the pleasure of taking pictures of it in the mist!

Sweet Potatoes and Cabbages

Yum. Thai red curry with pillowy sushi rice. More winter comfort food, for a California girl raised on pan-Asian comfort food, that is.

Despite repeated okonomiyaki sessions, I still had a ton of napa cabbage. And an untouched Wakefield cabbage on top of that. What would I do with this festival of cabbage that wouldn’t require long periods of fermentation or the application of corned beef?

After mentally combining my many cabbages with what remained of my box – a few sweet potatoes and carrots – plus a tub of tofu and a couple cans of coconut milk from my recent trip to an actual grocery store, the direction dinner was heading in seemed clear.

Thai Red Curry with Sweet Potato, Cabbages, Carrots, and Tofu

Napa Cabbage

As the weather gets colder, I find myself with a hole in my belly that can only be filled by some kind of indefinable, completely yummy food. For me this mysterious ultimate craving usually falls into the savory category, and I do know that it should be hot, and have a soft, yielding texture.

I’ve had this huge napa cabbage sitting in my fridge since the previous box, and so I decided to see what my beloved Asian Vegetables cookbook had to offer. In the section for napa cabbage I found a recipe for okonomiyaki, which are Japanese savory pancakes. The recipe might as well have been subtitled “The answer to your winter food longings.”

I sliced up some of that napa cabbage along with a red onion I’d bought (because who can resist that color combo of pale green and lavender?). I mixed a few of my eggs with some broth and flour and tamari, stirred in the veggies, poured it all in a hot oiled pan, and scattered bits of my beloved tempeh bacon on top.

Okonomiyaki, uncooked

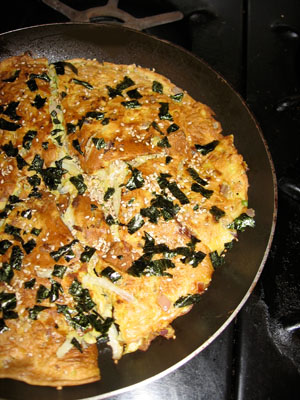
Then I cooked it, quartered and flipped it, let it cook through, and sprinkled it with toasted nori and sesame seeds.

Hot, savory, yielding. Stuffed with sweet, soft napa cabbage and red onions. Full of flavor from the seaweed and sesame. And I haven’t even mentioned the crazy dipping sauce made with ketchup, sake, and dried mustard!

Okonomiyaki, cooked

(The recipe for okonomiyaki is beyond the “more”) Continue reading