Pickle Porn

I mean like food porn. Geez, I say pickle and look where your mind goes!

I’ve been really into making refrigerator pickles these days. They’re easy and super gratifying.

I made dill pickles for the first time, with my friend Iris, and when they were finished we were so excited because they looked exactly like dill pickles! It was like making a cake that looks exactly like the one on the magazine cover. Only really, really easy to achieve.

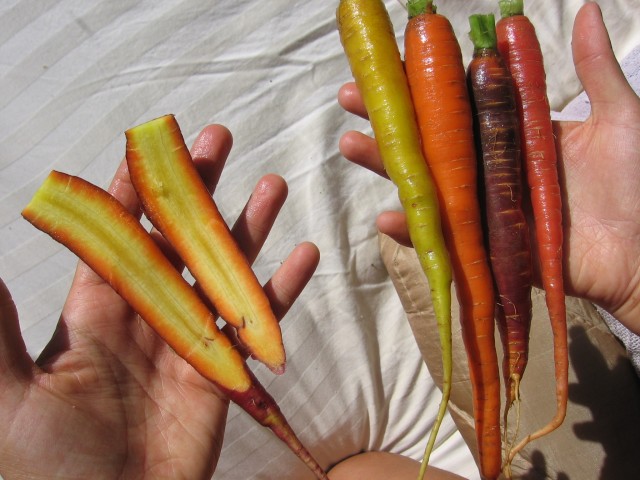
As exciting as the dill-pickle-looking pickles were, my visual favorites this time around were the carrot pickles. Iris brought us beautiful carrots that were not only a variety of colors but also had rings of color going towards the core. Sliced in half and pressed up the side of a pickle jar they are gorgeous.

The recipes I used during this particular pickling session were for dilly beans, sweet and spicy daikon and carrot pickles, and dill pickles. We also threw some garlic and some cherry tomatoes into leftover brine. For the record: putting cherry tomatoes into a jar of brine does not lead to pickled tomatoes. Which might be for the best, because I’m not sure I’d like pickled tomatoes.

In terms of flavor my favorites are the carrot and daikon pickles. But that’s because the dilly beans and the dill pickles both have a strange, chemically aftertaste to them that Iris and I can taste but other people seem not to be able to discern. I used a super cheap gallon jug of white vinegar, on the assumption that all white vinegar is created equal, but I’m wondering if it was the culprit in the off flavor.

Anyways I am now always on the lookout for fridge pickle recipes to feed my new addiction. Any favorites?

In other news, I have a guest post up today at xgfx for Vegan MoFo!

Culture Club ~ A story in (mostly) pictures

As I mentioned in my last post, I love love love fermenting food. For a long time I was interested but terrified – terrified of botulism (which you actually can’t get from fermenting food, just from canning it improperly) or any other undetectable-yet-deadly bacteria I might grow and then unknowingly kill myself and others with. I went to a lot of workshops and read some books and then was lucky enough to live with my very dear friend Farmer B. Farmer B is not only fearless about this kind of thing but also has a real talent and instinct for it. She’s a bacteria and yeast whisperer, you might say.

Farmer B getting ready to do some bacteria-whispering

The other barrier to doing urban-homesteader type food projects is time. There’s a reason we as a civilization have moved further and further away from DIY methods and developed all these conveniences – they save us the tons of time it takes to make foods by hand. To ferment vegetables you have to brine them for hours. Canning similarly involves hours of sterilizing, filling, boiling, etc. Of course a lot of this is down time, but let’s be realistic, you’re still going to spend the whole day in the kitchen.

So many veggies to chop and brine...

Which is why Farmer B and I created Culture Club. When you can chat while you chop and play games while the veggies are brining, crafting food becomes a party rather than a chore. It’s been hard to coordinate Culture Club with Farmer B so frequently away (farming!) but we took advantage of a window of Bay Area time and gathered friends together.

It's better with friends!

Culture Club has two components. One is making foods and the other is tasting/demoing foods. This is so that people who are perhaps interested in kombucha, say, can taste it and get an overview of the process before they commit to making it themselves. This time around we had two projects. The first was kimchi, using a recipe from Sandor Katz’s marvelous book Wild Fermentation. (Katz has been invaluable in helping me get over my paranoia about killing my loved ones with improperly fermented foods.) Culture Club had previously made a radish and roots kimchi, but this time around we went for the classic combination of napa cabbage, carrot, and daikon radish.

Giant, beautiful produce makes me dreamy! (That's a daikon radish I'm swooning over, there.)

Our second project was a blood orange cordial. A few months ago, I found an electric cordial maker (called “Cordially Yours!“) at Goodwill that promised to make cordial in hours rather than weeks, and I was super excited to test it out. I had done a small test-batch a few days earlier (no sense in wasting all that vodka if the thing didn’t even work) with Royal mandarins, but then a friend brought over blood oranges for a snack during a movie night and Farmer B and I just fell in love with the color. How dreamy would it be to have blood-orange colored cordial?

Zesting and juicing blood oranges for cordial

Blood orange juice & zest + vodka + sugar + "Cordially Yours!" + 4 hours = cordial. We hope!

While we waited for the vegetables to brine and the cordial maker to work its magic, we had our demo/tastings/lunch. Farmer B brought kombucha for all to try, and made a big pot of ogi, a fermented millet porridge, following another Sandor Katz recipe. We ate the ogi with stir-fried Chinese greens and homemade sauerkraut and turnip pickles, which were my contributions to the tasting party. I rounded out our lunch with cheela (mung bean pancakes) with tomato-coconut chutney. We also enjoyed a healthy amount of my initial test batch of cordial, which we had to drink for informational purposes of course. How could we know how to adjust the recipe if we didn’t drink thoroughly of the test version? And no Culture Club would be complete without a rousing round of some game, so after lunch we sat down with Balderdash (“the hilarious bluffing game!”) while we waited on the vegetables.

Tasting cordial out on the porch, where we brought the brine to cool it in the open air

Trying to fool each other with made-up definitions of obscure words

Once the vegetables had finished brining, we mixed them with a paste we’d made in the food processor of garlic, scallions, and ginger. I use a special Korean chili flake that seems like it has been deyhydrated in some way (not just dried, which I realize is the definition of “dehydration” but these seem like they were made into chili paste and then that was dehydrated and flaked and then you reconstitute it with warm water) and we made a paste from that and added it in as well. Kimchi can take a lot of heat before it starts to get spicy – we went through almost an entire giant bag of chili flakes.

Brined vegetables topped with two types of flavoring paste

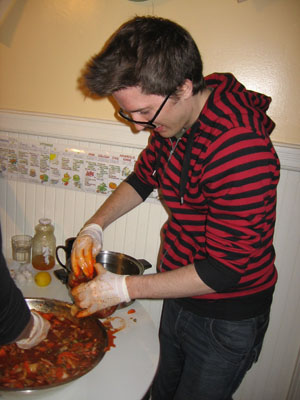
Mixing the kimchi is the best part of the whole experience. We get to wear gloves – it’s DIY food surgery! (Is that gross?) The chile paste and the salty brine can be quite painful on your hands, but with protection you can flip and toss to your heart’s content.

Stuffing jars with kimchi (with gloves to protect our hands from the chile paste)


The cordial finished with little fanfare. It turned out I hadn’t stirred long enough to dissolve all the sugar so there was a (tasty) bunch of it left on the bottom of the machine, which hadn’t happened during my test run. Even though the Cordially Yours! remarkably cuts the time cordials need to sit, the instructions do recommend that fruit cordials be allowed to steep for three days after the machine has worked its magic. So we poured it into jars and sent everyone home with their cordial and their kimchi. In three days and a week or two, respectively, each would blossom into the exciting foodstuffs of our dreams! (I know that’s the stupidest ending sentence ever for a blog post but it’s been a really long day and for some reason this post took forever to write. The whole “story in pictures” thing was supposed to make it go faster, but apparently that plan was a failure. Anyways. Let’s look at the pretty pretty things we made:)

The finished products! Blood orange cordial in the foreground, kimchi in the background.

Culture Club: Winter Radish and Root Kimchee

It was Farmer B’s idea to start a club for people to get together and share knowledge and skills about fermenting, pickling, canning, and preserving. Then one night when I couldn’t sleep I sat there thinking idly of potential names, getting nuttier and nuttier in my sleep-deprived brain, and ultimately decided it would be called “Culture Club” (y’know, like the bacterial and yeast cultures that ferment foods…). The basic idea is for people of varying degrees of skill and experience to get together and make stuff, share tips and ideas, and end up going home with delicious treats.

The club did our first project on Sunday, a kind of dry-run with friends before we try opening up to the community at large. FB (as club president and all around most-knowledgeable leader) chose winter-appropriate Radish and Root Kimchee from Sandor Katz’s great book about live-culture foods, Wild Fermentation. We had an amazing time, from the gorgeous abundance of the Berkeley Bowl produce section (where else can you reliably count on finding burdock root, Jerusalem artichokes, and fresh horseradish?) to the end of the long day when we revisited the wacky-name-game and brainstormed silly titles for our gorgeous jars of kimchee. (The winner: The Root of Passion, for its root veggie content, fiery color, and the fact that we made it on Valentine’s Day!)

There was a lot of chopping. We used turnips, daikon radish, carrot, red radish, burdock root, Jerusalem artichokes (sunchokes), and leeks as the base veggies, and blended up red onion, garlic, ginger, and horseradish for the seasoning. Farmer B had acquired particular Korean chili flakes made especially for kimchee, and we learned how to use them on the fly. We each took home a couple of jars of our spicy concoction (there are mild, medium, and hot variations), and will patiently check them each day to make sure they are still covered in brine while we wait for the miracle of fermentation to work its magic.

The whole process is very straightforward but does take a long time (about 4-5 hours for us, not including shopping), which is why it’s great to do with friends! Especially when one of them baked gluten-free chocolate ginger torte and another one brought Cranium Hoopla and you can sit around stuffing your face and playing games while you wait for the veggies to brine.

Kimchee would be a great thing to do with any CSA veggies that are fermentable. (I don’t know enough about fermentation to know if some are and some aren’t, or if anything goes.) I definitely started fantasizing about kimchee green beans while we were making this batch, and of course I love the traditional napa cabbage version as well.

Some fermentation tips Farmer B shared with us beginners:

  • Never use chlorinated water, as it kills off the cultures necessary for fermentation. You can use distilled water or purified water or boil the water and cool it to room temperature or just leave the desired amount of water sitting in the open air for 24 hours. (Britta-style filters only remove the taste of chlorine, not the chemical itself.)
  • Never use iodized salt, for the same reason. Non-iodized sea salt is good to use.
  • Things to use as weights: best are glass bottles (in a smaller jar) filled with water or plates (in a big crock) weighted down with a heavy jar or can. You want your weight to be as wide as possible, it should be almost the size of the mouth of your container. Some people use ziploc bags filled with brine (you want brine, not water, in case it leaks), but FB and I feel sketchy about leaching plastic into our food.
  • Make sure to check your batch daily as it sits, as the brine can sometimes evaporate unexpectedly. Any of your mixture above the brine level is in danger of molding, rather than fermenting. If this happens, you can just scoop off the moldy part and toss it, but the stuff still below the brine level will not be contaminated. To add more brine, mix up very salty water – saltier than you would feel comfortable drinking, is a good rule of thumb – and add it to your jar until the brine covers the top of your veggies again.

Radish and Roots Kimchee
This recipe is from the amazing live-culture foods book Wild Fermentation by Sandor Katz. And of course, though kimchee is traditionally made with fish sauce, this recipe is completely vegan (and naturally gluten-free).

INGREDIENTS (makes ~ 2 quarts – what you see in the photos above is many times the recipe)

2 clean, dry quart jars, or 1 gallon jar
sea salt
1-2 daikon radishes
1 small burdock root
1-2 turnips
a few Jerusalem artichokes
2 carrots
a few small red radishes
1 small fresh horseradish root (or a tablespoon of prepared horseradish, without preservatives)
3 tablespoons (or more!) fresh grated gingerroot
3-4 cloves garlic (or more!)
1-2 onions/leeks/shallots/scallions
3-4 hot red chilies (or more!), depending on how peppery-hot you like food, or any form of hot pepper, fresh, dried, or in a sauce (without chemical preservatives!). We used hot chili flakes from the Korean market in the Richmond, with a picture of a kimchee napa cabbage on the label. If you are using these flakes, start by mixing about 1/4 cup with warm water to make a paste, and then add to taste. Kimchee can take a LOT of heat before it gets too spicy, so don’t be shy!

Before you begin: I recommend reading the “tips” section above if this is your first time fermenting!

1. Mix a brine of about 4 cups water and 3 tablespoons salt.

2. Slice daikons, burdock, turnip, Jerusalem artichokes, and carrots, and let them soak in the brine. If the roots are fresh and organic, leave the nutritious skins on. Slice the roots thin so the flavors will penetrate. I like to slice roots on a diagonal; you could also cut them into matchsticks. Leave the small red radishes whole, even with their greens attached, and soak them, too. Use a plate or other weight to keep the vegetables submerged until soft, a few hours or overnight.

3. Prepare the spices: If you are using chili flakes, mix with warm water sufficient to form a paste and set aside. Then grate the ginger; chop the garlic and onion; if you are using whole chilis, remove seeds from the chilies and chop or crush, or throw them in whole. Kimchi can absorb a lot of spice. Experiment with quantities and don’t worry too much about them. Mix spices into a paste, adding grated horseradish. (We prepped everything in a food processor, and if you are using chili paste, you actually will want to apply it separately from the other ginger/onion/etc paste.)

4. Drain brine off vegetables, reserving brine. Taste vegetables for saltiness. You want them to taste decidedly salty, but not unpleasantly so. If they are too salty, rinse them. If you cannot taste salt, sprinkle with a couple of teaspoons of salt and mix.

5. (It’s best to mix and stuff jars with your hands here, but if you are using chili paste you probably want to wear gloves.) Mix the vegetables with the chili paste first, if you are using chili paste, until you reach your desired level of heat. Then mix in spice paste. Mix everything together thoroughly and stuff it into a clean quart jar. Pack it tightly into the jar, pressing down until brine rises. If necessary, add a little of the reserved vegetable-soaking brine to submerge the vegetables. Weight the vegetables down with a smaller jar, or with a zip-lock bag filled with some brine. Every day, use your (clean!) finger to push the vegetables back under the brine. Cover the jar with a clean dishtowel or other cloth to keep out dust and flies.

6. Ferment in your kitchen or other warm place. Taste the kimchi every day. After about a week of fermentation, when it tastes ripe, move it to the refrigerator.

Bottom Shelf & Crisper Drawers

The fridge project saga reaches its epic conclusion! It was a long, hard struggle to get here, one requiring culinary ingenuity and a superhuman tolerance for sniffing the mysterious contents of plastic containters, but 2009 can begin now in earnest with acres of shelf space and systems in place that should keep things tidy for at least, oh, one or two weeks.

Suit up team, we're going in! If I'm not back in one hour...

Suit up team, I'm going in! If I'm not back in one hour...

The bottom shelf was without doubt the scariest part of this whole ordeal. Cut off from light by the shelves above, the bottom shelf was a dark and crowded place crammed end-to-end with leftovers and whatever is left after leftovers move on to the next world. Almost the entire bottom shelf went straight into the compost. It was a much-needed mercy-composting for these containers, a good half of which were Thanksgiving leftovers. (I know, right? YUCK! I swear there’s a black hole back there that things disappear into, only to reemerge weeks later.)

Won't you put us out of our misery?

Won't you put us out of our misery?

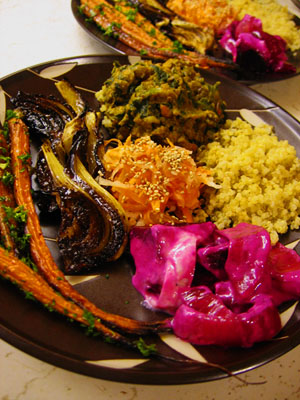
The crisper drawers were more fruitful, offering up a Ziploc full of spiced wine syrup to freeze for some future ice-cream-topping extravaganza as well as non-rotten produce in the form of oranges, apples, carrots, fennel, parsley, and a daikon radish. The bounty from the drawers kept us in side dishes all week with Balsamic Roasted Fennel, Roasted Carrots with Parsley, Homemade Applesauce, and Carrot-Daikon Salad with Sesame Seeds (recipe follows). Still more carrots, parsley, and the orange zest and juice went into an unfortunately hideous crock pot carrot soup that I will write more about later.

Roasted carrots, balsamic roasted fennel, carrot and daikon salad, baked beets and onion with horseradish sauce, lentil-spinach crock pot curry, and quinoa

Roasted carrots, balsamic roasted fennel, carrot and daikon salad, baked beets and onion with horseradish sauce, lentil-spinach crock pot curry, and quinoa

And with that, the fridge was complete. Emptied, reshuffled, reorganized, and ready to go. Let’s make 2009 the Best Fridge Year Ever! YAY!

New Year's Project complete!

New Year's Project complete!

Top Shelf
Middle Shelf & Door

Carrot and Daikon Salad with Sesame Seeds

1 large daikon radish (about 4-5 inches), peeled and grated
2-3 large carrots, peeled and grated
4 T. rice vinegar
1 t. salt
2-3 t. sugar or to taste
1 t. dark toasted sesame oil
Black and white toasted sesame seeds for garnish (optional)

Place the grated vegetables in a bowl, sprinkle with salt, mix well, and let sit for 30 minutes. Squeeze veggie mixture to drain it well. Dissolve the sugar into the rice vinegar and stir in the sesame oil. Top veggie mixture with the dressing, toss well to coat. Refrigerate overnight. Before serving, sprinkle each serving with a mixture of black and white toasted sesame seeds.

Sweet Potatoes, Snack-style

The last few boxes of sweet potatoes have come with newsletter entries urging me to eat them as soon as possible. As usual, I have quite the backlog of vegetables piling up, and the sweet potatoes, as warned, are not exhibiting the kind of hardiness that I generally use as an excuse to leave my potatoes in the back of the cupboard for a month or more. I knew the smartest means to total sweet potato consumption would not be to transform them into a healthy and filling stew or casserole. No, if I was to save these fellows fromSpicy Sweet Potato Fries withering in upon themselves as they seemed inclined to do, they must become snack food as quickly as possible.

I found a delicious sounding recipe for Spicy Sweet Potato Fries online at an attractive food blog called Kalyn’s Kitchen and decided to give it a try. I usually fiddle at least a little with every recipe I try, but this one seemed to need no improvement, and I made it exactly as written. And YUM! was I glad I did. Those potatoes were gone in record time. I now have a little baggie of premixed seasoning in my spice drawer, waiting happily for the next round of sweet-potato-into-snack.

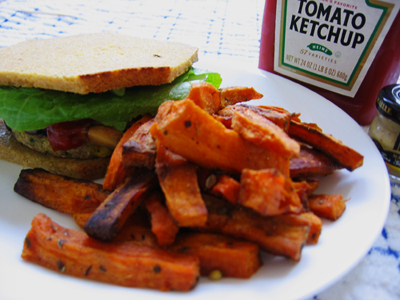
Having fries around even inspired me to do something I haven’t done in a long time: make a good old-fashioned all-American cheeseburger. The vegetarian, gluten-free version, of course, but it was still a kind of nostalgic treat. In addition to my spicy sweet potato fries my burger deluxe included daikon pickles and lettuce from my box.

Cheeseburger and Fries


Meanwhile…

My new box arrives tomorrow, and the only post I’ve made this week stars a vegetable that arrived a month ago. You may be feeling anxious for me right about now, wondering how I’m going to cope with an influx of new produce that will pile into my already overburdened refrigerator, since I clearly haven’t consumed any of the new arrivals yet. Fear not, gentle reader!, for this is not the case. I simply haven’t made anything worth photographing. So I thought that since this week has been so skimpy on posts I might make one documenting the simpler fates my produce meets throughout the week.

Because I know things are always better with pictures, I provide you with one here. What could be a better emblem of simplicity than my adorable rat, Crunch, nibbling a tender leaf of kale, no more processed than when it came out of the ground?

Crunch with kale

(For those of you who are grossed out even by pet rats, think of her as that cartoon chef rat in the Disney film Ratatouille. Everyone loved Ratatouille, right?)

The Fate of Box 10:

Lettuce: has gone into many a salad, including a full-meal salad tonight with carrots, thinly sliced daikon, Rome Beauty apple, napa cabbage, Manchego cheese, and hearts of palm, with a bizarre but tasty dressing of walnut oil, lemon olive oil, rice vinegar, and apple cider (I’m working on honing my dressing skills) .
Crocodile Spinach: Sauteed with garlic and then into a frittata with quinoa and port-infused Irish cheddar. Served with tempeh bacon, of course.
Pink Lady Apples: Snacked on straight and as a light lunch with some kind of beer-cheese. (Yes, I went a little cheese-mad at Trader Joe’s)
Satsuma Mandarins: Disappeared almost immediately as they are one of my top three favorite foods of all time.
Broccoli: Straight into the compost – more aphids than green stuff in this batch. So sad!
Kale and Collards: Immediately steamed and packed alongside quinoa and various lentil and chickpea dals from Tasty Bite, for several lovely lunches to-go.