Let’s Turn Up the Heat

It’s summer! I love summer. Summer means gorgeous produce I only get a few months out of the year – corn and tomatoes and peaches and nectarines. Summer means it stays light until late and the days feel like they might go on forever. Summer means bundling up in my warmest scarf and wool socks, turning the oven up to 450, and huddling beside it in my unheated kitchen. Wait, what? Oh, I should have mentioned, this is summer in San Francisco. It is, in fact, colder here in the winter than it is in the summer. But that doesn’t mean it doesn’t get damn cold here ‘twixt May and September.

This has also been a very tired summer for me. Since finishing up my first year of grad school, there has been a distinct increase in bed days and rest days. No problem, that’s what that 450 degree oven is for.

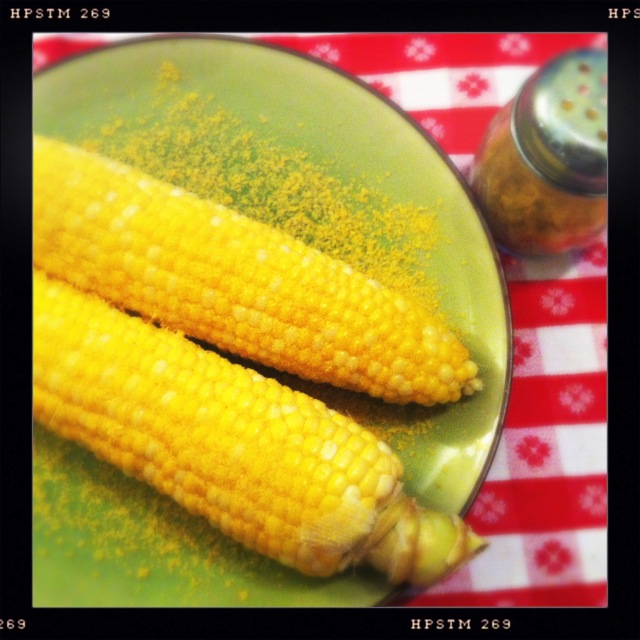
Two ears of corn on a green plate, sprinkled with nutritional yeast, with a shaker of nutritional yeast next to the plate.

It started with the corn. I love corn. My favorite way to eat summer corn is in fresh corn polenta. But that requires me to shave the kernels off the cobs, which involves a bowl and a knife and stuff. Too tired. I could steam it, but I have a bad habit of putting things on to steam and then getting back into bed, having one of my famous memory blips, and coming back far too late to find a scorched, dry pot. Consulting my trusty copy of Vegetarian Cooking for Everyone (love that “what do I do with this vegetable?” section in the middle!), I learned that corn can be roasted. IN THE HUSK. Here are the steps: Turn oven to 450 degrees. Take corn ears out of CSA box. Lay corn ears onto oven rack. Come back in 15 minutes (give or take, if you space out it’s cool, they are far from burning). Give a little tug and all the husk and silk come gently off at once. WOW.

Two ears of corn sprinkled with nutritional yeast, with a grey cat sniffing at them while standing on a red and white checked tablecloth

As an experiment I tried sprinkling it with nutritional yeast. It was pretty great. And I wasn’t the only one thought so! Miss Violet went absolutely bananas. She’s usually pretty good about not being on the table. She might jump up to check something out, but if I say her name or give her tail a little whack she’ll jump down right away. She knows she’s not supposed to be up there. But this time I had to forcibly remove her, picking her up off the table, with her struggling the whole time to get back to the nutritional yeast-covered corn. A little internet research seems to indicate it’s okay for cats to have (or very good for them, depending on the source) so Miss Smushyface was ultimately distracted with a little saucer of her own so I could eat my corn in peace.

A white bowl with chunks of zucchini, roasted and thickly sprinkled with herbs.

I had such a good time with the corn that I tried some zucchini next. My favorite way to eat summer zucchini is Pan-Seared Summer Squash with Garlic and Mint but that requires slicing the zucchini thinly, searing it a few pieces at a time in a pan, flipping and searing more, then repeating until all the slices have been cooked. Mint must be chopped, lemons must be squeezed, garlic must be minced. My new method: Chop zucchini into chunks. Toss with a teaspoon of olive oil, salt, pepper, and herbes de Provence. Put in a parchment-lined baking dish (or rimmed baking sheet) for ~45 minutes or until your desired texture. WOW.

I also tried this with some russet potatoes and cauliflower that came in my box. I don’t have a picture because we ate it too fast. Disher said it was one of the best things he’d ever put in his mouth. I have to concur. Roasted cauliflower is amazing.

So I have my new summer formula. And as an added bonus, it helps keep the house warm on those foggy damp summer nights.

Summer Roast Corn

Fresh corn, still in its husk

Preheat oven to 450. When oven is heated, lay corn on oven rack. Let roast for 15 minutes. Remove corn and, using some sort of heat protection on your hands, pull away the husk. All the silk and husk will just slide right off. Sprinkle with nutritional yeast if desired.

Summer Roast Zucchini

Fresh summer zucchini

Preheat oven to 450. Cut each zucchini lengthwise down the middle, then cut across into 1-inch chunks. Toss with a little olive oil (I use a 1 1/2 teaspoons for 4 zucchini), salt, pepper, and herbes de Provence. Line a baking sheet with parchment. Roast zucchini 45 minutes to an hour, or until meltingly tender and browned.

Summer Roast Potatoes and Cauliflower

Potatoes (I’ve tried Russets and Yellow Finn)
Cauliflower

Preheat oven to 450. Cut veggies into small pieces. Cauliflower florets around 1 inch, potatoes around 1/2 inch. Line a baking sheet with parchment. Roast veggies 45 minutes to an hour, or longer, or until tender and browned.
Baby Bok Choy and Mushrooms ~ Week of July 4th (plus bonus vegan July 4th BBQ menu!)

Another gorgeous box full of deliciousness this week. Here’s what came in my giant Harvest box from Full Circle:

Baby Bok Choy, Organic – 1.25 pounds
Russet Potatoes, Organic – 3
Cauliflower, Organic – 1
Celery, Organic – 1
Cremini Mushrooms, Organic – 0.66 pound
Avocados, Organic – 3
Red Leaf Lettuce, Organic – 1 bunch
Rainbow Chard, Organic – 1 bunch
Red Beauty Plums, Organic – 5
Pluots, Organic – 2
Nectarines, Organic – 4
Peaches, Organic – 5
Strawberries, Organic – 1 box

My substitutions this week were potatoes (traded in for radishes) and nectarines (switched with Valencia oranges). I’m so excited about everything that came in my box! The cauliflower is enormous. I don’t know if I’ve ever laid eyes on a bigger cauli. I can eat a small cauliflower’s worth of Impressionist Cauliflower all on my own at one sitting, so it will be nice to actually have enough to share with friends or stretch over several meals.

I’m quite pleased to see these nice big heads of baby bok choy, which I haven’t had in a while. A couple of old favorites come to mind. I could combine them with that gorgeous bouquet of rainbow chard to make Sunrise Noodles with Gingered Greens and Tofu or stir-fry up a mouth-watering batch of Spicy Bok Choy with Garlic and Ginger.

The lettuce, celery, chard if I don’t use it for noodles, and most of the fruit will all probably go into green smoothies. The mushrooms and potatoes look like they’d be delicious together. I’m not sure yet what I want to do with them, but I am already dreaming of some scrumptious savory mushroom-potato treat.

My 4th of July BBQ menu today was amazing! It didn’t actually incorporate much from my box; I’m not around grills much, so there were some very specific foods I was craving. It was an all-around winning combination of foods, and I want to record it here for future reference.

Vegan July 4th BBQ Menu

  • Sandwiches: GF garlic kale sourdough bread from Bread SRSLY, grilled marinated portabella mushrooms (using the marinade from Appetite for Reduction), grilled thick-cut red onion rings, spinach, sliced tomato, & wasabi mayonnaise.
  • Spicy sweet potato fries with vegan aioli (made from a mixture of 3 different types of white & orange yams/sweet potatoes)
  • “Banana boats” inspired by this post at Vegan Crunk. Our version: take very ripe bananas, make a slit in them & stuff with chocolate chips. Put them on a piece of foil on the grill & grill the heck out of ’em. Then pour some bourbon on top to do a kind of flambĂ© thing. Make sure you grill the bananas until they’re good and soft. Then if you like, you can do what we did, which was gather around about 20 people with only 2 clean forks, so we were all feeding each other bites in a kind of banana-chocolate-bourbon mouth orgy.

The most delicious Indian baby food ever!

Last night marked the beginning of the Great Pressure Cooker experiment. I made Curried Potatoes with Cauliflower and Peas from this month’s Vegetarian Times, and I am pleased to report that I did not have my face scalded off by an explosion of steam, nor was I decapitated by a flying pot lid.

At the last minute – literally, I had a spoon in one hand and my laptop in the other – I finally found an article online that walked me through step by step how my old Mirro Matic pressure cooker works. All pressure cooker recipes assume you know what it means when they say “bring up to high pressure” and so on, but I needed a detailed, basic tutorial to get me started and I was lucky to find one in time to make my first pressure cooker meal!

When the cooker had cooled and I was able to open the lid, I stuck a fork into the potatoes and cauliflower and was shocked and dismayed to encounter no resistance at all. Ah yes, I learned that fateful night that the pressure cooker is a force to be reckoned with, a powerful tool whose might should not be underestimated. I had my friend Disher try some and he agreed with me that the flavor was terrific, and that we had just made the most delicious Indian curry baby-food ever. So, next time I’ll turn the heat waaay down. It was confusing trying to figure out when the weight was “only hissing and jiggling 2-3 times per minute.” But I clearly overdid it by a long shot.

My new BFF FoodsCo had bunches of Chinese mustard greens for $0.58 yesterday, so I made a batch of those to go with our tasty baby food. I wonder if something is changing in my brain, because for the first time in a long time I had no problem improvising a recipe. I prepared the greens with onions, tomato, and capers, and they were phenomenal. Both recipes are below.

The texture of this dish is supposed to be chunks of potato and cauliflower, not a smooth creamy mass as shown here!

Curried Potatoes with Cauliflower and Peas
Adapted from Vegetarian Times Jan/Feb 2011. I added more spices because I love whole cumin and mustard seed, and I added some lemon juice at the end because it really needed a bit of acid to balance the flavors. This is supposed to be a “30 minutes or fewer” recipe and it actually did take 30 minutes (not including prep time, of course, because they never do…).

2 tsp. canola oil
1 large onion, chopped (or a 10-oz pkg diced onions)
4 cloves garlic, minced
2 tsp. minced fresh ginger (I use Ginger People’s in a jar)
1 tsp. curry powder*
1 tsp. ground cumin
2 tsp. mustard seeds
1.5 tsp. whole cumin
1/2 tsp. turmeric
6 Yukon Gold potatoes, cut into 1/2-inch pieces (1.5 lb)
1 head cauliflower, cored and cut into 1-inch pieces (1.5 lb)
1 tsp. sugar
1 cup frozen peas, thawed
1/4 tsp. lemon juice, or to taste
Salt and pepper to taste

1. Set out peas to thaw
2. Heat canola oil in pressure cooker over medium heat. Add onions and cook 2-3 minutes or until softened.
3. Stir in garlic, ginger, curry powder, ground cumin, mustard seeds, whole cumin, and turmeric, and saute 2 minutes.
4. Add potatoes, cauliflower, sugar, and 1/2 cup water.
5. Close pressure cooker and bring up to high pressure. Cook 5 minutes. (To do this on an old-fashioned Presto or Mirro Matic, read this article.)
6. Release pressure with quick-release button or transfer pressure cooker to sink and run cool water over rim to release pressure. If dish is underdone, close the top, return the cooker to high pressure, and cook 3-5 minutes more.
7. Stir peas and lemon juice into cauliflower mixture and season with salt, pepper, and additional lemon juice to taste.
Serves 6.

*I HATE store-bought curry powder; it’s one of the few flavors I can’t stand. I prefer to always use a blend of individual spices when I am making curries. However, I know that some recipes (like this one) call for curry powder for speed and convenience, so I make up small batches of a homemade blend made from ground whole spices that I keep on hand. (I can’t find the recipe for you right now… I guess I’ll be in trouble when I run out!)

Chinese Mustard Greens with Tomatoes and Capers
This dish would work well with any kind of mustard green, turnip greens, or even collards, though the cooking time will be quite a bit longer for collards and you should use only the leaves, not the collard stalks.

1 tsp. olive oil
1/2 an onion, diced
1 clove garlic, minced
1 bunch Chinese mustard greens, washed and sliced into thin ribbons (you can include the stalks, just slice them thinly)
1.5 T capers
1 14-oz. can diced tomatoes
Salt and fresh ground black pepper

Heat olive oil in a large pan over medium heat. Add onion and garlic, season lightly with salt and pepper, and saute 2-3 minutes until onion has softened.
Add greens to pan and allow to deflate slightly. Then gently toss and stir greens and onions until greens deflate significantly.
Sprinkle capers over greens and stir to combine. Continue to cook greens until they are barely tender.
Pour diced tomatoes into pan. For fresh-tasting greens with crisp stalks, cook only until tomatoes are heated through and greens and stalks are tender and edible. For Southern-style longer-cooked greens, let the tomatoes come to a simmer and simmer greens until they are dark green and delicious!
Season with salt and pepper to taste (you may not need any more salt because of the onion-salting step, and depending on how salty your canned tomatoes are).

Riding the vegan express train ~ Review of Vegan Express by Nava Atlas

If you’ve been reading along lately you’ll know that I have been attempting to streamline my cooking process. Left to my own devices I am given to elaborate preparations, multiple courses, long baking times, and sauces, dressings, and marinades of all sorts. This produces generally excellent meals, of course, but the trouble is that if I’m tired or pressed for time my only option is to put an Amy’s into the toaster oven. (And, because I don’t have a microwave and Amy’s takes 45-55 minutes in the toaster oven, if I am really pressed for time my only option is my friend the Bumble Bar.) So I’ve been wanting to retrain myself, to open up an avenue into the type of cooking that doesn’t take all night.

I have a fun thing called brain fog that means it’s hard for me to process complex information quickly. This in turn means that improvising under pressure is not my forte. So to help guide me to quick-meal paradise, I turned to my local library for support. The first book I checked out was Vegan Express, by longtime vegetarian cookbook author Nava Atlas.

Vegan Express offers recipes that can be prepared in 30 to 45 minutes. Each recipe comes with a comprehensive list of menu suggestions that include both ideas of other recipes from the book to pair with the dish as well as accompaniments that don’t require a recipe. An example of this would be the suggestion, “If you want to add one more item, steamed broccoli would be just the thing. Or, if time is not an issue, may I suggest upgrading that to Spicy Sesame Broccoli (page 197)?”

Bok Choy, Edamame, and Celery Quinoa with Toasted Cashew and Mandarin Oranges from Vegan Express

I’ve read through the entire cookbook, and have made five different recipes from the book, one of them twice already! I have really enjoyed cooking from Vegan Express. Atlas introduces each section and each recipe with a bit of information, which is almost always a cookbook requirement for me. I just like this so much better than when a recipe is simply presented unannotated as a bare list of ingredients and directions. The recipes generally conformed to the time frame (as with every “quick” cookbook, it all depends on how fast you prep veggies, and how dirty your greens are), and most importantly the directions were extremely clear. I’m willing to spend a little more time cooking as long as it’s entirely stress-free. Vegan Express walked me carefully through each dish and, with one exception, everything I needed to know was there on the page.

I had a great time matching up the veggies that came in my CSA box to recipes from the book. It felt like the recipes were very flexible and accommodating in terms of substitutions. I did do a little flavor doctoring on each recipe, but I pretty much always end up doing that with cookbook recipes, and the base recipes made a wonderful starting point and made it easy and obvious to bring the flavors up a level.

Vegan Express is not gluten free, but most of the recipes will work with a gluten-free diet. There’s a yummy section on seitan that made me a little sad, but all the pizzas, pastas, quesadillas, and wraps would work if you had the appropriate GF bases on hand (let’s hear it for Tinkyada brown rice pasta! and La Tortilla Factory teff wraps!). I try not to be overly reliant on soy, especially processed soy like soy cheese and soy creamer, and there are a fair number of tofu recipes and recipes that use soy cheese, etc., but there are many more recipes that use beans, lentils, nuts, and so on, so I think the book would even have a lot to offer someone who was avoiding soy entirely.

Pasta "Carbonara" with Tempeh Bacon and Baby Broccoli, Salad with Avocado and Pumpkin and Sunflower Seeds with Basic Vinaigrette from Vegan Express

The five recipes I tried were Tofu Aloo Gobi (cauliflower and potato curry); Tempeh, Kale, and Sweet Potato Skillet; Pasta “Carbonara” with Broccoli; Bok Choy, Edamame, Cashew and Orange Rice; and the Basic Vinaigrette. The section on “big quesadillas” also inspired me to start making my breakfast burritos as quesadillas instead – more room for filling! – and the salad suggestions prompted me to incorporate more creative fixin’s into my salads which I then topped with the excellently balanced Basic Vinaigrette, made with apple cider vinegar.

All four main-dish recipes were terrific – filling, delicious, creative, packed with protein and veggies, and easy to prepare. My favorite was the tempeh, kale, and sweet potato skillet. It’s an unexpectedly simple recipe that contains the one flaw I found: the recipe tells you how to prepare the sweet potatoes and the tempeh and has you set them both aside, and then never mentions them again! But I just used them to top the kale mixture and the final result was phenomenal. I made the aloo gobi twice in two weeks since I had two heads of cauliflower. Once I used fresh tomatoes and once I used canned, and the dish came out perfectly both times.

It’s been a while since I bought a new cookbook, but I’m going to be ordering Vegan Express when the time comes to return this copy to the library. Here’s a little teaser of a recipe for you – if this recipe or anything I’ve written here intrigues you, I encourage you to check out Vegan Express yourself!

Tofu Aloo Gobi from Vegan Express

Tofu Aloo Gobi (Cauliflower and Potato Curry)
(recipe is straight from Vegan Express by Nava Atlas so you can get a sense of what the cookbook offers)

2 T. olive oil
2 garlic cloves, minced
2 large potatoes, peeled and diced
1 medium head cauliflower, cut into small florets
2 tsp grated fresh or jarred ginger
1 tsp garam masala or good-quality curry powder, or more to taste
1/2 tsp ground cumin
1/2 tsp turmeric
1/2 tsp dry mustard
8 oz firm or extra-firm tofu, sliced, blotted dry, and cut into small dice
2 med or 3 plum tomatoes, diced (I used part of a can of diced tomatoes one time and it was great)
1/2 cup frozen peas
1/4 cup minced cilantro, optional
Salt to taste
(I added a little sweetener and extra grated ginger at the end)

Heat oil in a wide skillet or stir-fry pan. Add the garlic and saute over medium-low heat until golden.

Add the potatoes and about 1 cup of water. Cover and bring to a simmer, then cook over medium heat for 5 minutes.

Add the cauliflower, sprinkle in the ginger, garam masala, cumin, turmeric, and mustard, and continue to simmer gently for 5 minutes.

Stir in the tofu, tomatoes, and peas, and cook over medium-low heat for 10 minutes longer, stirring occasionally. Stir in the optional cilantro (and extra ginger/sweetener, if using), season with salt, and serve.

Bounty from the middle of the table, part 1

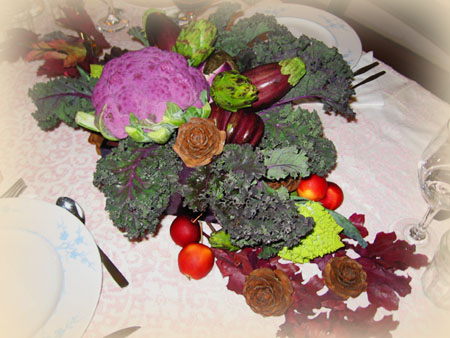
As if it wasn’t enough that we completely denuded her home in the name of the ultimate vegan, gluten-free Thanksgiving (sorry, Mom! we’ll get your chairs, tablecloths, candlesticks, cushions, serving dishes, silverware, bowls, dessert plates, and glasses back to you soon, I promise. No more eating from mixing bowls!), my mom also brought our Thanksgiving table to life with a gorgeous “only in California” centerpiece made from a bounty of local, seasonal produce.

centerpiece2

A centerpiece artist extraordinaire, she didn’t know what colors and themes would be called for, or how much space we would have (not much, as it turned out – we had to use three improvised sideboards as it was to hold all the food), so she arrived at our place bearing many bags of handsome fruits and vegetables. She ended up going with a striking theme in purples and greens that people commented on all night and long after the event, and I ended up with so much produce it was like getting two CSA boxes (at least!) at once.

So there was a second Thanksgiving feast after the first, only this one was composed entirely from the centerpiece!  Leftovers from the big dinner got us through the weekend with house guests, and then it was time to turn my attention to all the beautiful bounty slowly wilting in the middle of the table. I wisely turned for inspiration and guidance to my favorite food bloggers, and they did not lead me astray.

Cauliflower

Technicolor purple cauliflower and fluorescent green fractaled romanesco went into the roasting pan to make Roasted Cauliflower Soup from FatFree Vegan Kitchen. I made the soup exactly as directed, although my truffle oil had gone rancid (it was a stocking stuffer given to me a while ago, so it’s not like I lost a big investment, phew!) so I couldn’t add that note at the end. It definitely needed a hint of fat for flavor and mouthfeel – I tried toasted walnut oil and that worked pretty well, but any more than one or two drops would have overwhelmed it. Generally, though, the soup was very good.

romanesco

I really just have to learn that I can’t use romanesco in recipes that call for cauliflower. It’s too dry and tough, for one thing, and too bitter for another. Had I made the soup solely with cauliflower I imagine it would have been silky smooth but because of the darn romanesco it never got beyond a nubby puree. The color was pretty, though, fading to grey-brown when cool but warming back up to a dark lavender.

caulisoup

Roasted Purple Cauliflower Soup

Eggplant

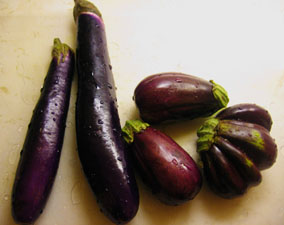
Eggplants featured prominently in the centerpiece, ranging in color from beautiful white and pale purple to the deep purples so dark they were almost black. The week before Thanksgiving we made a big batch of benghan bharta, our favorite eggplant dish of all time, so I wanted to try some new recipes this time.

eggplant

Karina, the Gluten Free Goddess, had a recipe for Eggplant Caponata that sounded really, insanely good. I even had olives in the house, which I never usually do ($8.99/lb at Rainbow Grocery, no thanks!), from the fancy olive assortment my mom brought over for appetizers. I roasted a fraction of my eggplant supply and whipped up Karina’s caponata in the food processor.

My gut instinct was not wrong – this stuff was really, insanely good. Duck and I basically had it as our complete meal, with crackers, for several meals in a row. I used canned tomatoes rather than fresh because tomatoes aren’t in season here right now, and that did not hurt a bit. The spread was too sweet for me, though, so I would probably skip the agave nectar next time, or at least taste the spread before adding it.

Eggplant Caponata with Olives and Capers

Eggplant Tapenade with Olives and Capers

I hated eggplant for most of my life and refused to eat it, until a few years ago I had some amazing, life-changing (in the eggplant department at least) eggplant pakora (eggplant breaded in chickpea flour and deep fried) pushed on me by the exceedingly interactive owner of our favorite local Indian restaurant. Once I became willing to try a little eggplant here and there, the dish that probably converted me from eggplant hater to full-time eggplant eater was Nasu Dengaku, grilled or fried eggplant with miso sauce. The eggplant is cooked until it melts into the softest, smoothest texture, and then it is broiled with a sweet-salty-sticky-yummy miso sauce on top.

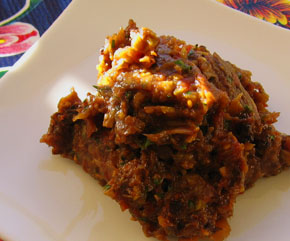
I’ve been wanting to try making Nasu Dengaku (Broiled Japenese Eggplant with Miso Sauce) at home for a while now. Earlier this month I tried a recipe from Mark Bittman’s How to Cook Everything Vegetarian that involved pan-cooking the eggplant rather than grilling or frying it, but it didn’t turn out well at all. (Partly this was because we only had extremely assertive red miso for the sauce, rather than the traditional mild white miso. But the texture was all wrong, anyways.) This time I turned again to Fat-Free Vegan Kitchen, for a recipe that involved broiling as the main cooking method for the eggplant as well as for the traditional miso-sauce-broil.

Nasu Dengaku - Broiled Japanese Eggplant with Miso Sauce

Nasu Dengaku - Broiled Japanese Eggplant with Miso Sauce

The recipe uses agave nectar rather than sugar, which I think is great. I’ve made sushi at home for years, but when I first started preparing Japanese food other than sushi I was shocked to realize how much sugar is used in nearly every preparation. It even goes into sushi, too, as a component of all the cooking liquids that vegetables and mushrooms are simmered in to prepare them for rolls.

I made the recipe for Nasu-Dengaku exactly as directed, with one very notable exception. Rather than taking 3 minutes per side in the broiler to become tender, I would say my eggplants, which look to be the same size as the ones Susan uses, took more like 12 minutes, or more, per side. Who knows what wacky differences there are between broilers – the broilers on an electric oven, a modern gas oven, and an antique gas oven (like mine) aren’t even the same appliance – they just share a name. Once they were cooked through, however the broiling time for the miso sauce was perfect as given.

The final result was perfect! Exactly what my mouth was imagining! Make sure you have the right eggplants-to-mouths ratio so they can be eaten right away, however. They did not make good leftovers, sadly.

Well, now… the bounty from the centerpiece was so generous that I’ll have to complete my tale in another post. Stay tuned for artichokes, kale, and more!

Spinach for breakfast, the sequel

I’m totally enjoying the feature on wordpress that lets me see what google search phrases have led people here, to my box. I get a lot of visitors on “aphid” related searches, and surprisingly few on “community supported agriculture” related ones. (Although I get a lot of CSA-specific visitors clicking over from the Eatwell list of member blogs and from the post on Chowhound about choosing a CSA.)

Frittata with spinach and Humboldt Fog cheese with salad

Super Easy Pan-Cooked Spinach Fritatta with Humboldt Fog cheese, green garlic, spring onion, and thyme (medium-pan sized, cut in half) with a salad of lettuce, red cabbage, cauliflower, carrot, and sugar snap peas

One surprising search phrase that shows up almost every day, sometimes in multiple versions, is some variation of “spinach for breakfast.” Which is, of course, the title of a post I made back in February extolling the pleasures of spinach as a breakfast food. My first thought of course is, “Wow, there sure are a lot of people who want to know about eating spinach for breakfast. Huh.” My next thought every time I see that someone’s search for breakfast-spinach information led them here is a bit of guilt. Because my first Spinach for Breakfast post is more about my personal, heartwarming journey to spinach acceptance than it is a helpful guide on how to use spinach in one’s morning meal. Which I assume is what all these googlers are googling for.

So I decided to revisit the topic of spinach for breakfast. It gives me an excuse to share a recipe I’ve been wanting to share. The other morning I was cooking breakfast (it involved spinach, of course) and thinking about how much this one recipe, which isn’t even a recipe but more of a technique, completely changed my breakfast life. I used to think I was “not a breakfast person” and “not an egg cooker” because fried eggs bored me, scrambled eggs eluded me, and frittatas were special occasion food involving all kinds of fancy cooking and flipping using plates or pans with heat-proof handles so you could finish them in the oven.

Frittata with thyme and Carmody cheese, tempeh bacon, pomelo fruit salad

Super Easy Pan-Cooked Frittata with Carmody cheese and thyme (small-pan sized, whole), tempeh bacon, and fruit salad with pomelo, kiwi, apple, and mint

This technique is usually how spinach ends up in my breakfast, but it’s also a great, simple way to incorporate most any kind of leftover into a hot, pleasing morning meal. It’s so obvious that I feel a little silly even writing it down, but I so distinctly remember the change in breakfast, from before I practiced this to after, that it seems worth taking the time to share it.

Recipe below… Continue reading

Scrap Stock

Some kind of revolution took place before I was born, or at least before the chef side of me was born into consciousness. By the time I made my first forays into vegetarian cooking, there was a kind of stock backlash happening in the pages of all the cookbooks I read. According to all these veg-empowerment cookbooks, people used to make their stock from scraps and trimmings, but now, especially for a vegetarian cook without simmering bones and flavorful marrow to add to the pot, this was highly discouraged. We are worth it!, these books proclaimed. Worth a delicious, savory stock made from whole vegetables and bundles of aromatic herbs. I made vegetable stock from one of these recipes once. I almost cried to see pounds and pounds of beautiful vegetables reduced to a heap of mush and a pot of broth.

All the scraps, ready to go into the stock

And so the scrap stock experiment was born. For a bit more than a week I saved all the trimmings from every vegetable I ate. Brown or yellow bits went straight into the compost, but everything else was washed and put into a tightly sealed plastic tub in the fridge. At the end of the week, I made an experimental stock. I had no idea how it might turn out. Really bitter, I suspected, because the majority of the heap consisted of the green, almost leathery tops of leeks, green garlic, and spring onions. But I figured, what do I have to lose? All I’m really wasting is the water I’m adding – everything else was compost-bound. At the last minute I almost chickened out and added a whole onion, a whole carrot, just a few things to boost the flavor, but I decided to really go for it this first time and just see what happened.

Here’s what ended up going into my scrap stock pot:

Leek greens and ends
Green garlic greens and ends
Spring onion greens and ends
Swiss chard stalks
Onion ends and peels from red and white onions
Red cabbage leaves from the outside of the cabbage
Spinach crowns
Garlic ends and peels
Thyme stalks
Carrot leaves and trimmings
Cauliflower leaves
Kale stalks
Radish trimmings
Sugar snap pea tops and strings

All the scraps in a pot, turning into stock

I cut everything into pieces and then first sauteed the allium trimmings (leeks, garlic, onions) for a bit in 2 teaspoons olive oil, then threw everything into the pot and stirred it over pretty high heat for about ten minutes. Then I added 3 quarts of water, 2 1/2 teaspoons of salt, 3 bay leaves and a few peppercorns, brought it to a boil, turned it down to a simmer, and simmered it, uncovered, for about half an hour. I let it settle for a few minutes and then strained it right way (I’ve heard stock can get bitter if you let the bits sit in the broth too long after cooking). And I have to say, it is quite, quite tasty. Certainly head and shoulders above the bitter brews that pass for vegetable broth in those vacuum-boxes. I can’t wait to freeze it and have it on hand the next time I need veggie broth for something. Best of all I am so tickled to have created something really valuable from something I’ve been throwing away. There may have been a broth revolution, but I guess I’m just an old-fashioned girl.

The stock, rich and flavorful, made totally from scraps!

Surrealist Romanesco

In my family we love three things above all else: food, art in all its forms, and people. (This must be why we love to travel so much!) In elementary school I was the only kid I knew who had a favorite artist (Matisse, for his brilliant use of color and shape). My mom and I have always been firm believers that the museum gift shop is nearly as much fun as the exhibitions themselves, and years ago my mom brought home as a museum souvenir a remarkable cookbook. Called The Impressionists’ Table, the book offers a series of truly delicious- sounding French menus based on Impressionist works of art involving food. This is the kind of book I took immediately to bed with me and stayed up late reading, and it is still crammed with the scraps of paper that I used to mark the many dishes I wanted to try. One of these dishes, deceptively simple but incredibly addictive, entered constant rotation, first in my mom’s house and now in my own.

Surrealist Romanesco

Ever since a lone cauliflower arrived in my box last fall my mouth has been watering for this dish, which I’m sure has its own name but which we in my family call simply “Impressionist Cauliflower,” in honor of the cookbook that brought it to us. My plans for that cauliflower were foiled back in November by the Great Aphid Disaster, and, because I am eating only what arrives in my box, I haven’t had another opportunity. So when a head of romanesco, that fractaled chartreuse cruciferous cousin, showed up in my box, I jumped at my chance. The resulting dish, with its brash color and form, seems better suited to more modernist schools than the refined, genteel white cauliflower side-dish I’m used to (or even like something you might find growing in a corner of a Bosch garden), so I’ve renamed this version of the dish Surrealist Romanesco.

I actually like the taste and texture better with cauliflower, and lately I have been trying out steaming the vegetable rather than boiling it as I usually do. I tend to discount vegetables that aren’t dark green as not being very nutritious, but having recently read up on the amazing nutritional powers of cauliflower (and I assume of romanesco as well) I felt guilty and ashamed at the idea of boiling the goodness out of it.

It was fun to try this recipe out with Romanesco, and, while I think I’ll stick to making it with cauliflower from now on, at least this gives me a great opportunity to pass along a beloved family recipe.

Impressionist Cauliflower
I leave the decision up to you whether to use cauliflower or romanesco (but read this post before you decide), and whether to boil or steam. You want your veggie to be quite, quite tender – NOT mushy, but not crunchy at all.

1 head cauliflower
1 T. red wine vinegar
1/2 t. salt
3 T. olive oil
1 tsp. herbes de Provence

Combine all ingredients except for cauliflower in a small bowl and whisk.

Wash the cauliflower. Separate the florets from the base using a sharp knife. (I usually slice up the base as well – this dish is so good I want to make as much of it as possible from one cauliflower!)

Plunge the florets into a pot of boiling, salted water. Cook ~10 minutes or until tender but firm. Do not overcook

Drain well. Pour vinaigrette over cauliflower. Serve warm or allow to marinate and serve chilled or at room temperature.

Serves 2, max!